As the advancing homebrewer matriculates through the phases of their new found hobby, they often find that their uber-hoppy and 10%+ ABV aspirations give way to more session-able, less alcoholic, even sensible ones. By "session," I mean that multiple (perhaps 3+) pints can be consumed within a single session on a work/school night. Although many of us homebrewers have fairly high Etoh tolerances, the goal of a session beer is not to drink as many beers as possible and still walk, it's to ENJOY as many beers as one wants without going past that easily reverse-able "buzz" stage, thus allowing one to drive safely and avoid annoying hangovers. It is also to provide enough flavor to be interesting, but not overwhelm the taste buds. Some would say that a 5% beer qualifies as a session beer; however, I (as usual) prefer to push the envelope and limit my "session" beers to 4% or less. "How can such a beer fulfill your flavor requirements?" you may ask. Let's look to the UK for inspiration. For centuries, our large-eared, crooked-toothed brethren across the Atlantic have enjoyed milds and bitters that barely transcend the 3% mark, and, yet, are still flavorful. One such beer (which I recently enjoyed) is Cain's Finest Bitter, This style has all the requirements for a session beer. It is a medium-bodied, dark mahogany beer, with moderate fruitiness and roast, and I have attempted to clone it below.
Cain's Best Bitter Clone (5.5 gallon batch)
OG: 1.040
IBU: 31.5
ABV: 3.6%
Color: 16 SRM
Grist:
43.8% US 2-Row; 3.5#
37.5% Maris Otter; 3#
12.5% Bairds Carastan (35-37 SRM) 1#
3.1% UK Chocolate Malt (450.0 SRM) .25#
3.1% Special Roast (50.0 SRM) .25#
Hops, etc:
1.0 oz. East Kent Goldings (leaf) @ 45 min.; 20.5 IBU
1.0 oz. East Kent Goldings (leaf) @ 15 min.; 11.1 IBU
1.0 tsp. Irish Moss @ 15 minutes.
Yeast:
Wyeast 1469 West Yorkshire Ale
Procedures:
Mash at 151 (feel free to go higher with this to increase dextrins for more mouthfeel) for 50 minutes. Mash-out at 168 for 10 minutes. Boil for 60 minutes.
Look for more session beer recipes/brewdays in upcoming blog posts. Be Fermentive!
Monday, April 29, 2013
Monday, April 22, 2013
A New Season in Beer
I'm sure many of you are aware (some much more than others) of the flooding that has laid waste throughout the Midwest this week. The picture below is on my walking route.

However, one of the advantages of all this rain is that I have not had to water my hops at all. Other homebrewers, and those of you who live in regions south, have been talking about how your hops have emerged and are already 1 foot high in some places. Well, I hadn't checked mine for several days, thinking that the 6-8 inches of compost and soil would delay their arrival. I was wrong. The rains have coaxed the grass out of dormancy and it was quite high in my yard, so today I mowed the lawn for the first time this year. While picking up the sticks in the back yard that were the casualties of Winter, I looked at my hops again. They have all pushed up from the depths and are well on their way. Here are some pictures.
The Chinook (can't you tell?)


After spending the afternoon doing yardwork, it was nice to relax a bit with a double IPA by a fire made from the previous season's castoffs.

Bare tree and lacing


I look forward to many more evenings like this. Hopefully with a few friends, and a few good brews. Here's to shaking off the Winter chill and embracing the regeneration of Spring! Be Fermentive!
However, one of the advantages of all this rain is that I have not had to water my hops at all. Other homebrewers, and those of you who live in regions south, have been talking about how your hops have emerged and are already 1 foot high in some places. Well, I hadn't checked mine for several days, thinking that the 6-8 inches of compost and soil would delay their arrival. I was wrong. The rains have coaxed the grass out of dormancy and it was quite high in my yard, so today I mowed the lawn for the first time this year. While picking up the sticks in the back yard that were the casualties of Winter, I looked at my hops again. They have all pushed up from the depths and are well on their way. Here are some pictures.
The Chinook (can't you tell?)
After spending the afternoon doing yardwork, it was nice to relax a bit with a double IPA by a fire made from the previous season's castoffs.
Bare tree and lacing
I look forward to many more evenings like this. Hopefully with a few friends, and a few good brews. Here's to shaking off the Winter chill and embracing the regeneration of Spring! Be Fermentive!
Saturday, April 20, 2013
Equipment: Homemade Stir Plate
In addition to temperature control (a future blog post), one of the best ways to improve your homebrew is by pitching adequate amounts of healthy yeast. Depending on the OG of the wort you are trying to ferment, one vial or smack pack of yeast may not be enough. I recommend using a yeast calculator, such as one of the calculators in the links list, to estimate how much yeast to pitch. But how do you pitch enough yeast without wasting money on multiple vials or smack packs? Use a stir plate. A stir plate allows one to grow up a large amount of yeast quickly via continuous aeration of the yeast starter wort. Stir plates can be purchased from many vendors, but they are easy enough to make yourself with a few key items and some knowledge. Here's how I made mine.
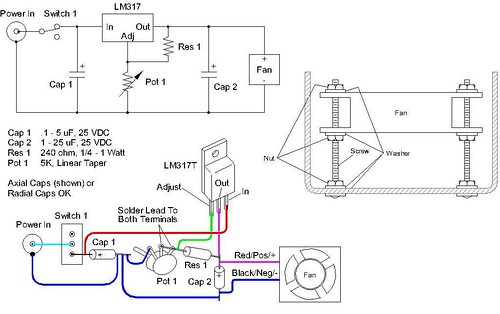
The stir plate is, essentially a spinning magnet that turns a magnetic stir bar inside your flask or beaker containing the yeast starter, so you need something that spins: a computer fan. You also need some neodymium magnets. These are easily purchased, but can also be found inside computer hard drives. These magnets are then hot glued to the center of the fan. You'll have to experiment with this to get the best placement. I used a piece of plexi-glass as a mounting surface, but there are many possible applications (a lot of people use cigar boxes or plastic project boxes). Needed as well are a 12V AC power converter and a potentiometer/rheostat (available at Radio Shack). I also added an on/off toggle switch.
I will warn you that some easy electrical wiring is necessary for this project and that if you don't have confidence in what you are doing, don't do this project. You could get hurt, or worse. Disclaimers aside, I wired mine very simply with electrical tape, although soldered connections are recommended. Here is a wiring diagram, but there are several examples available on the internet.
And here are some pictures of my stir plate:

Toggle switch

Potentiometer


Mounting bolts and nuts to plexi-glass platform

Magnets on fan hub


It ain't pretty, but it does the job.


In action with 4k mL flask


Never fear, get out there and make your own stir plate. Be Fermentive!
The stir plate is, essentially a spinning magnet that turns a magnetic stir bar inside your flask or beaker containing the yeast starter, so you need something that spins: a computer fan. You also need some neodymium magnets. These are easily purchased, but can also be found inside computer hard drives. These magnets are then hot glued to the center of the fan. You'll have to experiment with this to get the best placement. I used a piece of plexi-glass as a mounting surface, but there are many possible applications (a lot of people use cigar boxes or plastic project boxes). Needed as well are a 12V AC power converter and a potentiometer/rheostat (available at Radio Shack). I also added an on/off toggle switch.
I will warn you that some easy electrical wiring is necessary for this project and that if you don't have confidence in what you are doing, don't do this project. You could get hurt, or worse. Disclaimers aside, I wired mine very simply with electrical tape, although soldered connections are recommended. Here is a wiring diagram, but there are several examples available on the internet.
And here are some pictures of my stir plate:
Toggle switch
Potentiometer
Mounting bolts and nuts to plexi-glass platform
Magnets on fan hub
It ain't pretty, but it does the job.
In action with 4k mL flask
Never fear, get out there and make your own stir plate. Be Fermentive!
Wednesday, April 17, 2013
Thoughts About the Loss of Dave Conz

Last Saturday, one of my homebrew club's members, Stephen, arrived at our meeting and announced that Dave Conz had had some type of accident and had passed away. I should say at this point that Stephen was the only one at the meeting that had ever met him (myself included). My only connection to Dave is that he was a friend of a friend. But his influence was far reaching. Some months prior, Stephen learned of Dave's interest in homebrewing and all things beer, and added him to our club's Facebook page. Although I wasn't aware of the stretch of his influence at that time, I was always curious about who this aggressively sideburned and contagiously smiled individual was. Despite not having had the pleasure of knowing him, all in attendance raised their glasses in honor of the newly departed homebrewer. Later, when the newest Basic Brewing Radio episode popped up on my Facebook newsreel, I began to understand the gravity of Dave's passing.
Dave Conz had a very broad and eclectic academic background, spanning from engineering to the social sciences, and taught courses at Arizona State University on the influence of alcohol on culture and vice versa. But his involvement covered much more than that, as he appears to have been a true renaissance man. I'll not belabor an introduction, as others have done a fine job of listing Dave's interests and accomplishments. What I will say, however, is that I find it a peculiar feeling to regret not having known him. Sometimes in life we encounter people that we might never have met were it not for our various circumstances, goings on, and risk-taking behavior (you know, like telling a stranger, "hello"). Lately, I've been meeting several people with whom I share similar interests. But I didn't meet Dave Conz, even though we were only separated by 2 degrees of separation at most. From what I've learned about him since his death, I think I would have really enjoyed his company and outlook on life.
I refuse to speculate about the cause of Dave's death or it's possible motivations, but would simply like to consider the layers of loss produced by it. I think of the loss of those closest to him, his family and friends. I think of his colleagues and students, those who will no longer learn from him directly. And I think of the rest of us, who did not have the fortune to have known him, and cannot possibly feel the same kind of loss as those that did. The phrase, "you don't know what you're missing" comes to mind. I have only a glimpse of what I may have been missing, but it's enough to make me genuinely sad, nonetheless. This is the kind of influence I want to be able to have on those I know, or almost knew, when I pass. Hopefully, this will not be for a very long time, but one never knows. May you rest in peace, Dave Conz.
Dave with Charlie Papazian, Godfather of homebrewing.

Here is a Youtube video tribute to Dave for which I cannot take credit, but it shows more of that infectious smile. (Some of you ONUers may know or remember the woman with him in some of the photos.)
I close with a poem by Charles Baudelaire called Get Drunk
Always be drunk.
That's it!
The great imperative!
In order not to feel
Time's horrid fardel
bruise your shoulders,
grinding you into the earth,
Get drunk and stay that way.
On what?
On wine, poetry, virtue, whatever.
But get drunk.
And if you sometimes happen to wake up
on the porches of a palace,
in the green grass of a ditch,
in the dismal loneliness of your own room,
your drunkenness gone or disappearing,
ask the wind,
the wave,
the star,
the bird,
the clock,
ask everything that flees,
everything that groans
or rolls
or sings,
everything that speaks,
ask what time it is;
and the wind,
the wave,
the star,
the bird,
the clock
will answer you:
"Time to get drunk!
Don't be martyred slaves of Time,
Get drunk!
Stay drunk!
On wine, virtue, poetry, whatever!"
Always remember how you got WHERE you are, and are becoming WHO you are.
Be Fermentive, my friends.
Brewday: Brown Saison
Every once in a while, I get a hankering for something a little bit different than I might normally brew. But, then again, I wouldn't exactly describe my taste in homebrews as "normal." So, my mood of the moment spans two very different styles: low-gravity, sessionable, English-style, milds and bitters; and, Belgian, farmhouse saisons. I will, likely, cover the former in another post, but today I review a brown saison I brewed this past Sunday.
I won't get into the history of the style in great detail, but suffice it to say that, in general, saisons originated in the Wallonian, French-speaking, region of southern Belgium as a fortifying beverage brewed for and consumed by farm workers. It was brewed with a variety of grains and adjuncts, including sugar, and is traditionally a dry, low-alcohol beer with considerable yeast character. Today, although most iterations fall within the 5.5% - 6.5% ABV range, commercial saisons extend from 3.5% all the way up to 9% ABV. The version in the recipe below falls in the 5.0 - 6.0% range. You may be wondering (if you've read ahead) how a 1.070 OG wort will only yield a beer in the 5-6% ABV range. That's a great question. Here's the answer: When I split the batch, rather than pitching only the solid yeast at the bottom of my Mason jars, I pitched everything liquid and all. This diluted my wort some, but I also added an additional quart of juice (which is mostly water) to one half of the batch. These actions reduced the OG's to 1.058 (no juice) and 1.055 (w/ juice) respectively. Oh well, moving on...
Although saisons are not usually my favorite beers, I have had some that were quite enjoyable. I often find them more enjoyable when they are drier and focus more on the peppery yeast character than some of the other fruity esthers or spicy (clove) phenolics. What I did to try to achieve this goal was to grow up yeast from the bottle dregs of two different commercial saisons that I enjoy: Upright Brewing Company's Flora Rustica Saison, and Revolution Brewing Company's Coup d'Etat Saison. This technique can be accomplished fairly easily by making a yeast starter from malt extract. I put mine on a homemade stir plate that continuously aerates the starter for optimum yeast health. Because this beer is currently fermenting and I have not yet tasted it, I do not know exactly what my saison blend will lend to the finished beer. Tasting notes will likely be the subject of a future post. Anyway, here's the recipe and pictures from the brewday.
Brown Saison - all-grain (based on 75% extract efficiency):
Batch size: 5.0 gallons
OG: 1.070
IBUs: 29.4
Grist:
5.25# Pale Malt (Ger.) 40%
4.75# White Wheat Malt 37%
1.00# Old-fashioned Rolled Oats ~8%
0.75# Cara-pils ~6%
0.75# Special B Malt ~6%
0.50# Acidulated Malt ~4%
Hops:
60 min - 1.50 oz. Styrian Goldings (5.40%)
15 min - 0.50 oz. Styrian Goldings (5.40%)
I had originally planned a dry-hopping addition (1 oz. Styrian Goldings 5.4%, 7 days), but have since decided against it so as not to overpower the malt. I was going for a more malty beer with this saison, as demonstrated by my relatively high mash temperature. But, as always, be fermentive!
Yeast:
My Saison blend yeast culture (or any belgian/saison yeast you prefer; here is some info: Wyeast Labs, White Labs, Lallemand Danstar)
Procedure:
Mash at 153F for 45 minutes. Mashout at 168F for 10 minutes. If I had it to do over again, I might have mashed a bit cooler (~150F) to encourage a drier beer. But, as I said, I've not tasted this yet, so it might be fabulous. YMMV (your mileage may vary). I also might not have done a mashout step so as not to limit the fermentability of the wort prematurely.
Pics:
Vorlauf

Vorlauf, cont.

Saison yeast blend


"And we're mashing...and we're mashing." -Jeremy King, BrewingTV

Wort collection

Lovely, clear wort

An absolutely gorgeous day for brewing

Rolling boil

Enjoyed a double IPA

Cooling the wort. I never use a thermometer during this step anymore because 10 minutes is always more than enough time using this IWC. However, my need to do things differently led me to this design. Btw, Don O., of donosborn and BrewingTV fame, is a great repository of homebrewing knowledge. Go there, learn, be fermentive!

...still cooling

My rotund silhouette with a hat on. It was sunny and I'm not getting skin cancer if I can help it.

I split the batch and added this to half

Notice the color difference between no juice (left) and juice (right), and the weird coagulation happening. I'm sure it's fine. I've seen worse and tasted better.

No juice, close-up

With juice, close-up

Test jar sample of w/ juice. Hey, there's me in the reflection!

I hope you've enjoyed these pictures, but I hope even more that you try my recipe and let me know what you think, what changes you made, and how it goes. And, as always, Be Fermentive!
I won't get into the history of the style in great detail, but suffice it to say that, in general, saisons originated in the Wallonian, French-speaking, region of southern Belgium as a fortifying beverage brewed for and consumed by farm workers. It was brewed with a variety of grains and adjuncts, including sugar, and is traditionally a dry, low-alcohol beer with considerable yeast character. Today, although most iterations fall within the 5.5% - 6.5% ABV range, commercial saisons extend from 3.5% all the way up to 9% ABV. The version in the recipe below falls in the 5.0 - 6.0% range. You may be wondering (if you've read ahead) how a 1.070 OG wort will only yield a beer in the 5-6% ABV range. That's a great question. Here's the answer: When I split the batch, rather than pitching only the solid yeast at the bottom of my Mason jars, I pitched everything liquid and all. This diluted my wort some, but I also added an additional quart of juice (which is mostly water) to one half of the batch. These actions reduced the OG's to 1.058 (no juice) and 1.055 (w/ juice) respectively. Oh well, moving on...
Although saisons are not usually my favorite beers, I have had some that were quite enjoyable. I often find them more enjoyable when they are drier and focus more on the peppery yeast character than some of the other fruity esthers or spicy (clove) phenolics. What I did to try to achieve this goal was to grow up yeast from the bottle dregs of two different commercial saisons that I enjoy: Upright Brewing Company's Flora Rustica Saison, and Revolution Brewing Company's Coup d'Etat Saison. This technique can be accomplished fairly easily by making a yeast starter from malt extract. I put mine on a homemade stir plate that continuously aerates the starter for optimum yeast health. Because this beer is currently fermenting and I have not yet tasted it, I do not know exactly what my saison blend will lend to the finished beer. Tasting notes will likely be the subject of a future post. Anyway, here's the recipe and pictures from the brewday.
Brown Saison - all-grain (based on 75% extract efficiency):
Batch size: 5.0 gallons
OG: 1.070
IBUs: 29.4
Grist:
5.25# Pale Malt (Ger.) 40%
4.75# White Wheat Malt 37%
1.00# Old-fashioned Rolled Oats ~8%
0.75# Cara-pils ~6%
0.75# Special B Malt ~6%
0.50# Acidulated Malt ~4%
Hops:
60 min - 1.50 oz. Styrian Goldings (5.40%)
15 min - 0.50 oz. Styrian Goldings (5.40%)
I had originally planned a dry-hopping addition (1 oz. Styrian Goldings 5.4%, 7 days), but have since decided against it so as not to overpower the malt. I was going for a more malty beer with this saison, as demonstrated by my relatively high mash temperature. But, as always, be fermentive!
Yeast:
My Saison blend yeast culture (or any belgian/saison yeast you prefer; here is some info: Wyeast Labs, White Labs, Lallemand Danstar)
Procedure:
Mash at 153F for 45 minutes. Mashout at 168F for 10 minutes. If I had it to do over again, I might have mashed a bit cooler (~150F) to encourage a drier beer. But, as I said, I've not tasted this yet, so it might be fabulous. YMMV (your mileage may vary). I also might not have done a mashout step so as not to limit the fermentability of the wort prematurely.
Pics:
Vorlauf
Vorlauf, cont.
Saison yeast blend
"And we're mashing...and we're mashing." -Jeremy King, BrewingTV
Wort collection
Lovely, clear wort
An absolutely gorgeous day for brewing
Rolling boil
Enjoyed a double IPA
Cooling the wort. I never use a thermometer during this step anymore because 10 minutes is always more than enough time using this IWC. However, my need to do things differently led me to this design. Btw, Don O., of donosborn and BrewingTV fame, is a great repository of homebrewing knowledge. Go there, learn, be fermentive!
...still cooling
My rotund silhouette with a hat on. It was sunny and I'm not getting skin cancer if I can help it.
I split the batch and added this to half
Notice the color difference between no juice (left) and juice (right), and the weird coagulation happening. I'm sure it's fine. I've seen worse and tasted better.
No juice, close-up
With juice, close-up
Test jar sample of w/ juice. Hey, there's me in the reflection!
I hope you've enjoyed these pictures, but I hope even more that you try my recipe and let me know what you think, what changes you made, and how it goes. And, as always, Be Fermentive!
Friday, April 5, 2013
Splitting the Hops
One of the more common complimentary hobbies that consume the free time of homebrewers is gardening. Perhaps the most popular gardening-related activity is growing hops. Many hop varieties grow quite well in most parts of the United States. I may do a post fully devoted to growing hops in the future, but there is plenty of information available on the subject here and elsewhere. This post will specifically address my experience of digging up and splitting my 3-year-old hops.
I planted the hops seen below in the Spring of 2011, so this is the beginning of their 3rd year. In general, the hop plant is an extremely invasive species that will takeover an entire area if allowed to grow freely. Therefore, it is recommended that the hop crown (seen below) be divided up every 3rd year or so. As you can see below, this Chinook hop crown is quite substantial (approx. 1.5 ft diameter). But it started from a rhizome (underground stem) approximately 6-8 inches long. This is also how the majority of hop plants are propogated, from the cuttings of the crowns. Treated correctly, each cutting will grow into its own hop plant. I grow 6 hop varietals: Chinook, Sterling, Northern Brewer, Pride of Ringwood, Nugget, and Fuggle. After cutting down the crowns and replanting, I collected several grocery bags full of rhizomes to be replanted by interested homebrew club members. Get them while they last!

More rhizomes.

Sacks of rhizomes in the beer fridge. They're hiding my lagering Pilsner (notice the airlock).

Subscribe to:
Posts (Atom)